
How to choose the right metal extrusion frame so your boot clips properly to your vehicle
There are times when an installation does not have thin wall or flange. This is often the case with box truck conversions. This create a problem because the boot is design to clip onto a thin wall that is less than 3/16″. The thickness range is between 1/16″ to 3/16″. If the pass through opening wall are thicker than these measurement another solution needs to be made. In this article I will show you several different options when you installing onto a thicker wall. Below you will find practical ways to create a flange using common aluminum or steel extrusions.
Before You Start: Openings, Radii, and Flange Thickness
There are some things you will need to do to prepare the opening for the pass through. Here are some thing you need to consider.
Properly size the pass-through opening
First thing that is non-negotiable is the the truck cab opening and camper/box perimeter opening must be exactly the same. For easier installation it is also recommended that both openings be the same shape. If you fail to match the openings you will find that the boot will twist, bunch up and not meet at the ends. That is because of the embedded metal clip that runs the length of the accordion boot does not stretch or expand.
Corner configuration
In order for the rubber boot the seat properly it is recommended that the corner are not sharp 90 degrees or more. If the corner is too tight then the rubber will start to flare out due to too much pressure in the corner. It is highly recommended that there is at least a 1″ radius in each corner. Anything above that is fine. There are basically two ways the “soften” the corner. The first is to create a rounded corner. The second is to create a 45 degree angle at each corner. If the surface is a thin wall or FRP then you will probably create rounded corners. However is you need to create a flange you will probably need to go with the 45 degree option unless you have a machine that will bend radius corners.
Flange thickness for firm grip
In order for the boot to attach securely it will need to grip onto some sort of thin wall or flange. The range is between 1/16″ to 3/16″. You will need to keep this in mind when selecting the aluminum extrusion profile. 1/8″ is the optimum for gripping to the vehicle.
Surface preparation
If the surface you will be mounting to boot is steel here are some thing you will need to do. For steel cutout you will want to clean the edge so there are no shape burrs. For double wall steel if there are any gap between you will need to fill them. To avoid rust it is recommended that an raw unpainted surface get a coat of primer and paint.
If you are installing one of the extrusion mentioned in this article you will want to scuff and clean the area that mates to the enclosure. This will help the caulking bond better.
Material Choice
When it comes to what material to choose you basically have two options. The attachment flange for the pass-through can be fabricate with either steel or aluminum. When it comes to aluminum you will find a greater assortment of profiles. It is fairly easy to work with. Creating rounded radius corners may be more difficult. In the case of steel it is obviously stronger. If you are handily with a welder it it make the round corner easier. However with steel you need to take the extra step to primer and paint to avoid rust and corrosion.
Build notes
- Aim for material thickness */- 1/8″
- Create soft corners
- Use polyurethane caulking between flange and mounting surface
- Secure mechanically with screws around the perimeter.
Using different extrusion profiles to create the attachment flange
Option 1: Direct to Sheet Metal (No Frame)

If you are able to attach the boot to an already existing thin wall, this will not require any additional mounting flange to be fabricated. All you need to do is press the boot into place. Often time the pinch weld were a window use to be will be sufficient to clip the boot onto the vehicle. On the sleeper or camper if it is made with fiberglass the same applies. I will note that some fiberglass wall may be thicker than 3/16″. In this case you can either grind down the fiberglass to 1/8″ or fabricate a flange. In most cases the best option would be the flat bar.
Pro tips
- Deburr and roll the edge slightly; a smooth radius helps retention.
- Seal the cut edge with zinc-rich primer (steel) or epoxy primer (aluminum), then topcoat.
Option 2: Frame from F-Profile
The “F” profile is one option for fabricating an attachment flange for the accordion boot. The unique feature is that it will provide a small gutter. For this method drain hole are recommend especially on the top to prevent water from pooling. You could also reposition the the aluminum to hide the rubber.
Option 3: Frame from Z-Profile
The Z profile is another option. You will get a better bond with profile because it will attach to both the top and the side of the wall. One thing I should note that there are companies that sell a retainer ring that will already have radius corners. These rings are normally used in securing RV windows. You can get the rings separately. Unfortunately they will only came in very specific sizes no custom sizes. Of course you can always fabricate your own.
Option 5: Frame from T-Profile
Here is another idea for mounting and installing an accordion boot onto your custom pass through. This time it is the T profile. Like the Z profile the metal touched both the top and sides. The main difference is which side the leg attaches to the body. In the image above it is mounted on the outside of the compartment.
Option 6: Flat Bar
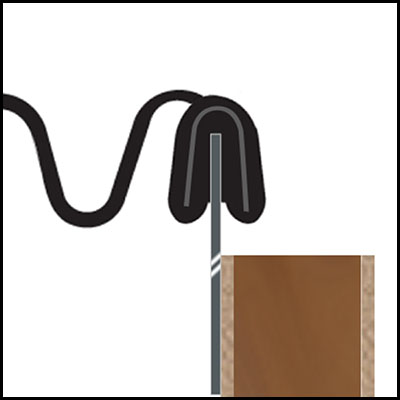
The flat bar approach is probably the easiest way to create a mounting flange for the accordion boot. Not only can you use aluminum or steel you can also use flat stock like FRP panels and sheet metal. This method also makes it easier to create nice rounded corners. The only caveat is the cutout will need to be cleaned up. With the other methods the metal usually covered to rough wall opening surface.
Build Checklist
- Cab and box openings match exactly (shape + perimeter).
- Inside corner radii ≈ 1 inch (or larger).
- Clip land thickness ≤ 3/16 in.
- All edges deburred and lightly radiused.
- Bond zones scuffed, cleaned, activated, and primed per adhesive spec.
- Frame coated after fabrication; bond zones re-prepared.
- Top orientation considers water (down-facing clip or gutter).
- Trial-fit boot—verify full, even clip engagement all around.
- Final seal bead where needed; add unobtrusive drain paths.
FAQ: Flanges & Frames for Accordion-Boot Pass-Throughs
Do the cab and camper openings really have to match?
Yes. The outer perimeter and shape must match or the boot will twist, gap, and leak. Treat this as “zero tolerance.” In practice, keep variance within about 1/16 in around the full perimeter.
What corner radius should I use?
Aim for corner radius of 1 in for the openings. A bigger radius make the clip seat smoother and reduce stress on the boot.
How thick should the flange be?
Keep the material the boot clips over */- 1/8 in thick so the spring clip seats fully. Do not exceed 3/16″ thickness
When would the clip pop off under flex?
If the boot is undersized, edges are sharp, or the vehicle sees heavy torsion. Use correct boot size, deburr/radius the flange, and verify even engagement all around.
Aluminum, steel, stainless or FRP—what should I choose?
Salt/spray exposure: Prefer 316/316L stainless or well-coated aluminum/steel.
General use: Aluminum is light and easy to coat; steel is strong but needs robust corrosion protection.
Flat Surfaces: Sheet metal or FRPDo I have to weld corners for frames?
If at all possible the option is to weld any place where the ends of the profile meets is recommended. This will give better leak protection. For smooth boot turns, you can weld corner segments or pre-bent radius corners. Avoid sharp, mitered corners.
Can I mechanically fasten instead of bonding?
Ultimately you should do both. Bonding spreads load and seals better. If you add fasteners, keep heads low-profile and out of the boot’s clip path.
How often should I inspect or service the boot and frame?
Every 6–12 months (or after heavy off-road use): check clip engagement, look for chafe points, touch up corrosion protection, and clear drains.
Will interior traffic wear the boot faster?
Yes, if the boot sits proud of the frame on the interior side. Consider installing some sort of covering over any place you will crawl or pass through.
Any final concerns before I cut?
Here are some thing you should confirm before making the first cut…
Matched perimeter openings,
Proper corner radii,
Flange material thickness,
Bond-zone prep,
Clip orientation,
full dry-fit engagement before sealer cures.
Notes on Terminology
- “Accordion boot,” “bellows,” “rubber seal boot” and “clip-on seal” refer to the same general part here—a flexible gasket with a spring clip embedded in the edge.
- The “clip land” is the flange edge the boot bites onto.
Rubber Boot Seal
You can order rubber boot material for your special project requiring pass through access. These seals are extruded from a durable EPDM synthetic rubber and incorporate a flexible spring steel clip for attachment to any flange. This material is sold by the foot. Choose between accordion boot or compression boot.